First things first, this carpet had to go. With hardwood flooring buried underneath, we couldn’t start soon enough. I was given the keys on December 11th and we began ripping up the carpet on the 12th.

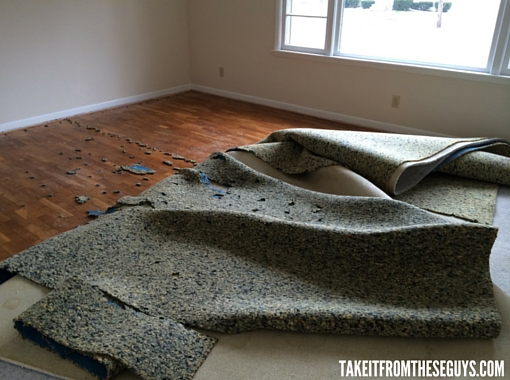
When removing carpet, make sure you vacuum it first. This will save immensely on cleaning up and keeping the air from becoming full of dust and other unpleasantness. The previous owner had what seemed like twelve cats due to the amount hair in the carpet…talk about an allergy attack. After filling the vacuum a couple of times, we started to cut up the carpet. Once we got a corner free, we cut the carpet long ways and began to fold it on top of itself, like in the picture. This worked for a bit, but then we decided to separate the carpet from the padding, roll up the carpet, and wrap a strip of duck tape around it. I cannot stress enough the truth to duck tape being a new homeowners best friend. The first ‘surprise’ we had was that the small hallway connecting all the rooms was not wood floor as we had thought. It was going to need new flooring installed, but we decided not to have a hardwood floor put in because of price and leveling issues.
With the carpet rolled up and placed in Jakes truck, it was time to get the carpet padding taken out. This is much easier said than done. The padding was stapled to the wood floor in the most random and undirected way. We pulled out as much padding with our hands as we could and took it to the truck. We then swept up any other loose pieces and called it a day. The dust can really get to ones lungs on a cold December night, especially when you don’t know how to use the heater correctly in the new house. Brrr.
For the next few days, Jake and I worked on our hands and knees to pull out the hundreds and hundreds of staples. After trial and error between a few different sets of needle noses linesman and pliers, we started to get the hang of it. It actually became very therapeutic. One night, we popped a bottle of champagne (first house warming gift), picked up some pizza, and turned up the tunes. It was extremely satisfying once all the staples were removed and we could actually walk around the room without the worry of getting a staple in the foot.

We still needed to remove the tack strips from the edging of the front room and hallway. Jake was able to do so with ease after the first try. He used a small wonder bar and hammer to make a wedge underneath the tack and leverage enough room to pull up on the strip. He was careful not to dig into the floor. I on the other hand could not get the hang of it. My strips kept breaking halfway through or I would dig the wonder bar into the flooring. Ugh. I blamed it on being left handed, but I don’t know how well that would hold up. So I gladly left this task in the trusty hands of Jake and continued to sweep and mop the floor.
After everything was cleared off, we knew the floor needed to be sanded and stained to really come to life. We budgeted it out and came to the conclusion that it would be cheaper (and quicker) to higher a local flooring company to do the job. It would have been more expensive for us to buy a sander and other tools. We are so pleased with the job these men did in such a short amount of time, only a day and a half. Granted, it is a small space, but they did an awesome job in matching the stain that I had visioned and really making it shine. See for yourself!


So far it has held true that once you start one project, two more get added on. The two projects added on because of this are hallway flooring and floor molding. The carpet was glued to the wall so there was glue marks along the bottom of the current molding. This can make things overwhelming at times, but we don’t let that get to us. We relish in it and look forward to it…or at least the fun parts.
